Pages

Tuesday, July 30, 2013

Notes of the 3rd & 4th Strings

Now that we have a little better understanding of the notes on the staff, let's move on to learning some notes on the 3rd & 4th strings of the guitar. I combined these two strings because, for the time being, there are only two notes that we're concerned with on the 3rd string: G & A. G is the note of the open third string & A is the note at the 2nd fret of the 3rd string. But two notes isn't much of a lesson. The notes of the 4th string are D, E & F. And we know that D is the note of the open 4th string. E is the note at the 2nd fret & F is the note at the 3rd fret. So we're playing the open 3rd string & then the 2nd fret, as well as the open 4th string & the notes at the 2nd & 3rd frets. Here's an exercise for you to try:


I love these five notes. They have such a melancholy air about them. I could play them over & over again. And I do quite often. You should too! Once you've become proficient at playing the exercise, try to increase your speed. But be sure to pick every note! No cheating with pull-offs or hammer-ons! Those will come later. For the moment, it will only help you to pick every note. Up-down-up-down. Do the same when strumming chords.

And say, do you realize how many chords you know already? You've learned C, A, G, E & D as well as Am, Dm & Em. With eight chords at your disposal, you could be writing hit songs right now! Let's put some of these chords together & see what we can come up with. Try these chord progressions:


Notice that the tablature has changed. You know how to play these chords, so you don't need the tab. The slashes simply mark the beat where the chords are played. Play through each exercise slowly. They're all in 4/4 time. But there are a lot of eighth notes & rests. So count to yourself "1 and 2 and 3 and 4 and" as you play. Look at the rests. They tell you where not to play.

For example, in study #1, you don't play on beat 2 or beat 4 in the 1st measure. Those are quarter note rests. So they each get 1 beat of silence. And the same is true of the 3rd measure. Similarly, the 2nd & 4th measures both play the same syncopated pattern. The D chord is played on the "and" after beat 2. The rest before it is an eighth note rest. It gets half a beat, which happens only when the beat hits "2" in our counting pattern. Then you play on "and". After beat 4, you rest on "and" before starting the next measure. It's a repeating pattern. So every other measure copies itself in an alternating sequence. See? Pretty cool sounding huh?

All three exercises are loosely based on the verse patterns from actual songs. See if you can figure out the title of each. Don't get discouraged. Play slowly & if that isn't slow enough, then slow it down some more. The beats per minute, shown as a number after the 1/4 note "=" above the 1st measure, are there to give you a guideline as to the tempo. But you don't have to start there of course. Play as slowly as you like. No one is watching you rehearse yet, most likely. And the important thing is to get the pattern right. Not how fast you can play it! Speed will come soon enough, I promise you.

The next two exercises should be played in the same slow, counting-while-playing fashion. Watch the rests! And pay attention to what is happening around the 2nd & 4th beats. That usually where the action is in popular music. You'll be rocking through all three of them in no time! And I'll be back soon with some notes on the 5th & 6th strings and even more chord progressions. Rock on!

Wednesday, July 24, 2013

The Treble Clef Staff: A Primer

Before we get into the next lesson, it has occurred to me that we need to look more closely at the staff for a moment. The 2 previous lessons can be played using only the tab notation provided below the staff. However, for those of you wishing to learn how to read standard musical notation (which I highly recommend!), the use of tab notation merely delays your education.


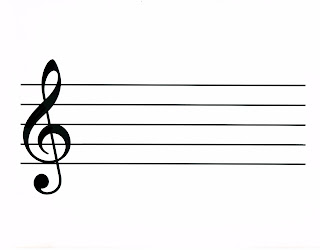
Look again at the treble clef staff. Notice that it has 5 horizontal lines & 4 spaces. A notes can be written either on a line or in a space. And each line or space refers to a particular note. Everything that you need to know to play a piece of music happens with this image.

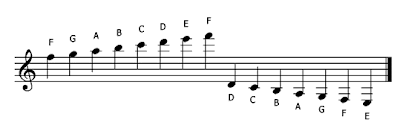
There are 7 natural notes in western music - A, B, C, D, E, F & G. And they all fall on the staff pictured above, with lower pitched notes occurring lower on the staff & higher pitched notes occurring higher on the staff. Here are the notes of the treble clef staff:


The notes on the lines of the staff are E, G, B, D & F. You can remember them easily using this simple sentence: Every Good Boy Does Fine. The notes that fall within the spaces are F, A, C &E. They can be remembered easily too. They simply spell out FACE.

So knowing only what you know just from these 2 graphics, you can already say that E on the bottom line is a lower note than F in the first space & D on the 4th line is a higher note than A in the second space. And you can say this without having any idea what these notes really sound like. It's just how things are on the staff.

Now you might be saying to yourself: "Hey wait a second! There must be more than just 7 notes in music." And you would be right. The staff continues above & below the image above, using what we call ledger lines to represent notes above or below the treble clef staff. Here is an example of ledger lines:


See how they continue above & below the staff? So far, every note we've played has been found on the staff. But a time will come very soon when we will have to escape the staff & use some ledger lines to play through our lessons. But that's still a lesson or two away, so don't worry about it too much yet.

Where do the notes of a guitar fall on the staff? Here is an example using only the open six strings:


Notice in the first 2 measures that the open 6th string & the open 5th string have ledger lines. Those 2 notes are represented below the staff  due to their low pitch. But since we've only played notes on the 1st & 2nd strings, we haven't made use of ledger lines yet. The six notes we've learned have all been on the staff. Here's what they look like together:


Try playing through this exercise. Notice the funny squiggle at the end of the 3rd measure & again at the end of the 6th. It's called a "rest". A rest means you don't play on that beat. Read the notes on the staff as you play, even if you're primarily using the tab notation. The notes are B, C, D, E, F, G, F, E, D, C & B (rest) followed by G, F, E, D, C, B, C, D, E F & G (rest). Simple isn't it? Work on playing through this exercise cleanly & using an up/down picking motion. Then, when you feel confident enough, try increasing your speed. And we'll learn about the 3rd & 4th strings in the next lesson. Rock on!

Tuesday, July 16, 2013

The 2nd string & the first minor chords

Okay now that you've learned some notes on the 1st string, it's time to move over to the 2nd string. The notes you learned last time were E, F & G. In this lesson, we will learn B, C & D. The open 2nd string sounds the note "B". The note played at the 1st fret of the 2nd string is "C". And the note played at the 3rd fret of the 2nd string is "D". Just like the notes of the 1st string, we're only playing the open string, the 1st fret & the 2nd fret. Simple huh?

So let's try out these new notes on the 2nd string. Here's an exercise for you to practice:


It's basically the same exercise as the last one, only it's on the 2nd string instead of the 1st. Now try playing the notes on the 2nd string followed by the notes you learned on the 1st string & back again. Here's how it looks in notation:


So now you know B, C, D, E, F & G. They even sound like a scale when played one after the other, don't they? That's because they're all part of the C scale. In the next lesson, we'll put these notes together in a song & learn some notes on the 3rd string. But for now, let's learn some more chords!

So far, you've learned the open chords C, A, G, E & D. Every one of them is a major chord. But many songs aren't just made up of major chords - although some are. There are also minor chords. Minor chords are the sad, sombre chords you hear in music. So let's learn some of them!


This is the A minor chord - often written like this: "Am". Try playing the A Major chord followed by this one. Can you hear the melancholy flavor of A minor? A Major is a happy sounding chord by comparison. Weird isn't it? And all that from changing only 1 note. The note on the 2nd string is flatted by 1 fret, or by one half-step. More about steps & half-steps later. For now, strum the Am chord until it sounds smoothly & clearly. Note that the 6th string is not used, just like A Major.

The Am chord starts off some very popular tunes, just like all the other chords we've learned so far. It's the 1st chord of "Stairway To Heaven" by Led Zeppelin; and the first chord of "Glass Onion" & "Things We Said Today" by the Beatles; as is "Last Dance With Mary Jane" by Tom Petty. And thousands of others! A minor is a very popular key!


Here is the D minor chord. As with A minor, you're only moving one note from D Major to play D minor. I'll explain why it works this way in a later lesson. And notice that you only play four strings, just like D Major. So play D Major followed by D minor. Then try playing Am followed by Dm. D minor is a very sad key. Some say it's the saddest of all the keys.

Strum the D minor chord until you are proficient at it. D minor is also found at the start of many songs. "Sultans Of Swing" by Dire Straits, "Another Brick In The Wall (Part 2)" by Pink Floyd & "Paint It Black" by the Rolling Stones all start on D minor.


The last chord for this lesson is E minor. It's one of the simplest chords to play, since it only uses 2 fingers. And you play all 6 strings. Some songs that start on E minor: "Welcome To The Machine"by Pink Floyd; "Turn The Page" by Bob Seger & "Riders On The Storm" by the Doors.

Try playing G, then Em, then C, then D. That's the chord progression for "Stand By Me" by Ben E. King. And it's the same progression used in "Blue Moon" by the Platters. In fact, it's commonly referred to as the "50's progression" because so many artists from that era either used it outright, or used some variation of it.

Anyway, congratulations on learning your first minor chords. You now know enough chords to play for hours on end. Keep practicing & trying different combinations. Next lesson, I'll give you some chord progressions you can really sink your teeth into. Rock on!