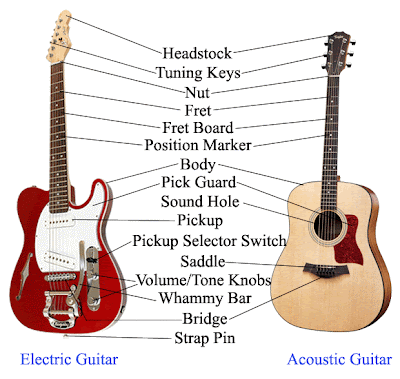
Before you get into playing, you should spend a moment looking over your guitar & familiarizing yourself with what the basic parts are. This is so we can all be on the same page when I mention the nut or a position marker as a reference point for a chord or scale. You'll need to understand these reference points, as I will make use of them many times over the course of the lessons.
So let's start from the top. Note the diagram above. The first things we see at the top of the image are the headstock & the tuning keys - also sometimes referred to as machine heads. As noted in my last post, this is where you tune your instrument. When you get around to changing your strings, you will become much more familiar with this part of your guitar, as well as the bridge.
The next part is where the strings pass from the headstock onto the fretboard. It is called the nut. It can be made from bone or plastic & is integral in maintaining the initial height of the strings above the fretboard. It is not really adjustable except by a professional guitar technician.
Next is the fretboard itself, where the frets & position markers are located. Frets are made of thick wire which is pressed into the fretboard at each fret location. The number of frets varies, depending on the overall length of the fretboard. They also vary in thickness & shape from one guitar to the next. When a string is said to be open, no frets are used, naturally. When a note is indicated at a particular fret, you place you finger on the corresponding string behind the indicated fret. The notes on a string vary in pitch depending on which fret you are on.
Position markers - sometimes called inlays - are literally the dots that you see on the fretboards shown above. They can generally be found behind the 3rd, 5th, 7th & 9th frets as single dots. Then 2 dots at the 12th fret. And another series of single dots marking the 15th, 17th, 19th & 21st frets. It depends on how many frets there are on a particular fretboard. These markers are only there as points of reference so you can quickly locate a position on the fretboard. Hence the name! They have nothing to do with the sound of the instrument.
After that we come to the body of the guitar, which can be hollow - as in an acoustic guitar - or solid - as in an electric guitar. Although some electric guitars can be semi-hollow, so that part is hollow & part is solid - like where the pickups & the bridge are located, for example. Notice that the fretboard generally extends onto the body of the guitar a little ways, where the two pieces are bolted or glued together. The amount that the fretboard overlays the guitar body can be more or less, depending on the guitar. Your guitar may or may not have a pick guard, but most do. It's just there to keep you from scratching the body as you strum.
An acoustic guitar will then have a sound hole, over which the strings pass. This is where the sound comes from when you pluck the strings. On an electric guitar, the strings pass over the pick ups, where the sound is literally picked up & then amplified by an amplifier, via a cable that plugs into the guitar. Sometimes, names make perfect sense don't they?
The strings then pass over the saddle, which has to do with maintaining the height of the strings at the body end of the guitar, much like the nut does at the other end. The saddle is generally a single piece of bone or plastic on an acoustic guitar. On an electric, there is usually one saddle for each string, which can be adjusted up or down as well as back & forth slightly. This has to do with setting the intonation of the instrument. We will get into how this works later.
Then the strings are then anchored into the bridge or just past the bridge. It depends on the manufacturer. And that completes our overview of the basic parts of a guitar. Now, let's strum some chords & start making music!

No comments:
Post a Comment